Monday, October 22, 2012

Just Plane Old Me

As a member of the Mixed Media Art on Facebook group hosted by Patri Ross I was able to join their first challenge called "Forming Friendships: 3D-Doll-Puppet Form Challenge." Patri matched us with other participants and my exchange partner is Sarah Cooper from Ottawa, Ontario, Canada.  So my first goal became not to upset the delicate balance between the US and our neighbors to the North. 

The project was to build a figure, puppet, or doll no larger than 10-12" high, with some sort of movable parts. It was viewed as a visual way to share a little bit about yourself.  The sign up was in August and the piece had to be mailed by October 15th.

I started with a torso from some superhero or wrestler toy and a small tin airplane I picked up somewhere.  I wanted to use this opportunity to address how making art has affected me in the last few years, or I guess you could say: given me the opportunity to fly.  Aaaawwwwhhhhh.  Oh, yeah, and I thought the toy figure was as close a representation of my figure that I could find.


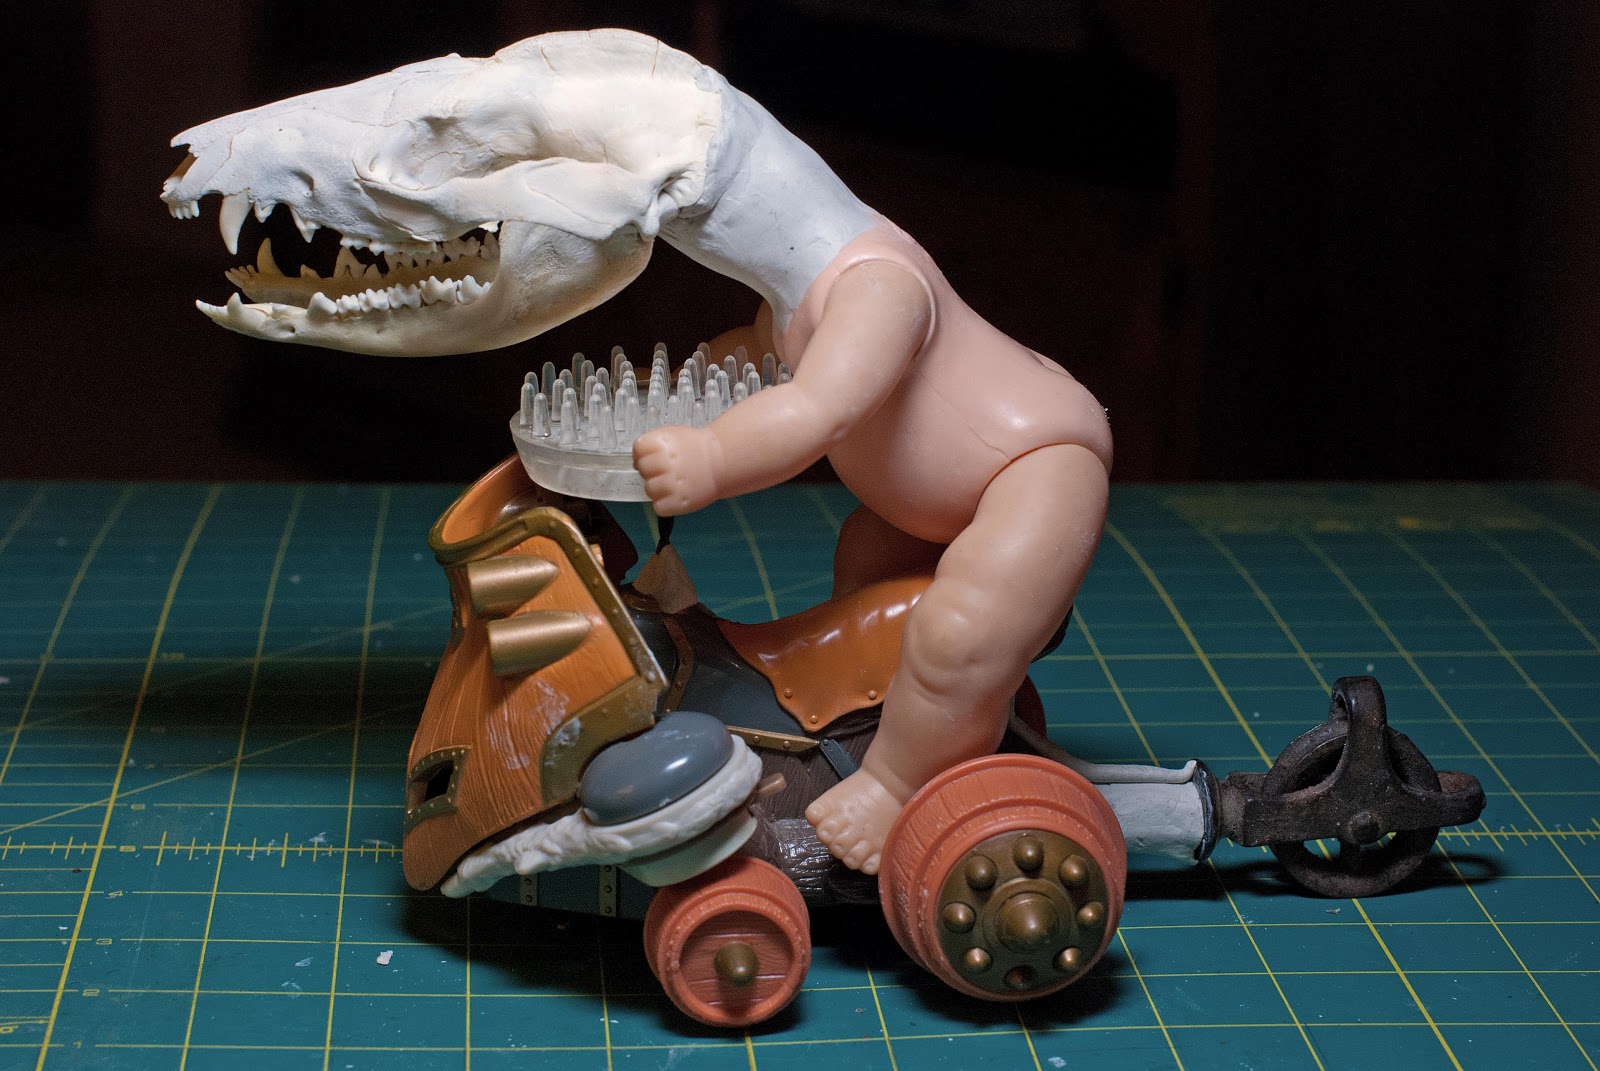
The first thing I did was use an old bottle opener to create a frame for a transfer of my baby picture with a watch cover.  The watch face went on the neck to indicate that the clock is always ticking. 


While that Apoxie Clay was drying, more of that was being used to keep two wooden Dutch shoes attached to the landing gear of the plane.  I would have preferred to use baby shoes but all the baby shoes I had in my found objects (ie: junk) were way to big.  Also, the propeller was formed by adding a watch spring. 


Then it was time to clay things together and texture up the body prior to painting. 


I added some other goodies to the back of the plane during the painting process.  They were three gears to enhance the tail section and one piece for a rear tire.  I also decided at some point this little guy needed to be holding something so a piece of metal (most likely a typewriter part) went in his hand.  In the end, this little guy's arms move up and down so he can be adjusted to his mood:  throwing the metal like a spear, holding it like a piece of art, etc.

The only issue I had putting this guy together was that despite using all the scientific principals of physics when putting him together, he listed to the left (my left, your right) so that I had to use some Apoxie to give him a lift.  If you should ever meet him, please do not mention this as he is sensitive about his height. 


Sooooo...here we have Just Plane Old Me.  It is made from about $8 worth of found objects and took 6 hours to make.  It is 6" l x 5" w x 8" h.  And I guess now it has duel citizenship. 

Here is the piece I received back from Sarah:  Clara.  Clara is articulated and floats sideways as she is wiggled. 


The poem reads:

Clara is a Fairy who recently earned her wings...
She has a tendency to fall and crash into things...
If you see her slip, fall to the right...
Please, give her a boost over to the left...
So she can re-start her flight!

Thanks, Sara!

Sunday, October 14, 2012

Mirroscope: the Buckeye Stereopticon Company

While shopping at a flea market at the National Shrine of Mary Help of Christians at Holy Hill in Wisconsin, Denice and I stumbled on a Mirroscope with a box of slides on one of the dealer's tables for $40.  Thus, the classic assemblage dilemma was set up:  how historic is the piece I am about to buy and can I hack it all to hell without a wit of conscience?

This was a hard one.  I liked the historical nature of this old projector and really wished it could be sitting in a museum somewhere.  On the other hand, if it did have great value to mankind's knowledge, would not it already be in a museum and not sitting in a flea market waiting to be sold for a minimal amount of money?


What is a Mirroscope?  Here is the basics (and the photo above) according to the Museum Victoria website: "Mirroscope, a projector known as an episcope, and sometimes called a magic lantern. The mirroscope was made by the Buckeye Stereopticon Co., Cleveland, Ohio, USA....Inside are two light sources, which illuminate the object to be projected. Usually this object would be a postcard, photo, or other printed matter, but objects such as coins or leaves could also be projected. The light is reflected through the lens, and the image is projected onto a wall or screen. The light sources are burners. The two chimneys are directly above the light sources, allowing the heat to escape while preventing light from entering. Focus is achieved by moving the telescope lens tube in or out...A six-faced object with a lens attached to the front panel. There are two cowls on the top to release heat produced by light source inside object. Rear panel is hinged at the bottom and opens to reveal a dual burner and mirrored reflector plates. Supported underneath by four feet".

After reading the above, my Mirroscope at some point lost its two cowls and had been converted to electricity.  Now I do not feel so bad about hacking it all to hell.


From the minute I saw the Mirroscope, I knew what I wanted to do with it.  I wanted to create a human shape wherein the image within would carry out the theme of the piece.  So step one became attaching some arms to the Mirroscope.  Over the years, after many tries at attaching stuff and having it fall off later, I have learned to create armatures for everything I want to stay on.  Because I always work in my front room in front of the television, I have to find interesting places to use as vices, braces and rest stops.


Eventually a matched set of arms are threaded through the Mirroscope and anchored with the rebar wire armature.  I made a decision not to add the feet I had planned for and keep this one a tabletop piece. 

A bigger challenge is what I want to do with the projection aspects of the head and body.  In rummaging my own basement, I came across a welder's mask that would work as a frame so I hacked into the head to create a passage way for the light and secured the mask to the head.  For the head, I selected a mannequin form I had purchased for a workshop and then never used. Then I had to Dremel an opening into the top of the Mirroscope to provide a way to attach the head and that was the hardest thing to do in terms of the historical nature of the old projector. 


Within the mask, I wanted to add an image.  I had an opportunity to do a model shoot at a photography studio so I decided to use one of the shots to represent what the guy is thinking. 


The last key element was what would be projected from within.  What stronger "within" is there but a heart?  So I used an image from an old anatomy book to create the red heart that would be projected from with the Mirroscope. 


I re-wired the electrical enhancement to the Mirroscope and left the back door flap of the projector unmodified so that I can replace bulbs as needed. 


Then it was time to put it all together with each joint carefully secured with Aves Apoxie Clay.

Painting this piece was a matter of finding the golds and greens in the Mirroscope reflected in the body parts added. 


While thinking about the theme and dealing with the name of the company, at the last minute I decided this piece needed some "buck" in the buckeye so I added antlers and painted them into the piece. 


So with $65 worth of stuff and after seven hours of work, we have Mirroscope: the Buckeye Stereopticon Company. 


At some point I will try to take better pictures of this one but the challenges are more than I can handle right now.  I hope you can at least get a sense of what this looks like when it it lit and when it is not. 

Wednesday, October 10, 2012

Speed Decayer

Determined to work small, I decided to launch into a project with the overall goal of not growing this object into something I cannot fit in my basement.  OK, I'll admit it--that is where I store all my stuff.

After a trip to the basement for parts, I decided these would be the base elements for the piece.


The first two steps involve evolving the trike and the doll body into something else. 
The trike needs a steering wheel for my purposes, so I found this plastic piece which I assume is an artificial flower frog.


And, because this is me--off with the baby head! I found this possum skull that seemed the right size so on it went. 


Both of these items were attached with Aves Apoxie Clay.  Because I am working at home and do not have workshop anxiety, it afforded me the opportunity to let the attachments dry for 24 hours.  This makes a big difference as I will admit, that on  previous occasions, in my haste things have flopped off because it does take a good cycle to have the clay really set.  Painting after a few hours OK; twisting and bending not OK. 

Once a day had gone by it was time to see how the piece would look assembled.  I decided that the piece needed another caster on the back to help with the look.  Eventually I will also add an extension on the front that includes a hand and an eyeball.  But what I really thought would unify the whole effort was to add something akin to a dinosaur's spin to run from head, across the back and out to form a tail.  So I reached for the Aves Apoxie Clay again. 


The next step for me on this piece was to unify everything with color so I started with a little caulk on the whole piece and then a coat of Titanium White.


One more last minute addition:  a big old floppy tongue made out of Aves Apoxie Clay.  Then I painted this little guy up.  Here is the final product:


So, after 5 hours and $15 worth of junk, I had Speed Decayer.  The last picture is how you will see him if he ever passes you on the highway going realllllllllllllll fassssssssst.